This is just a short clip of our Urban bee yard. It was taken from July till November first. It now almost Christmas and the weather is still favorable for them. They are still taking foraging flights and its December 23rd. Hope you enjoy this clip and have your self a Merry Christmas and a Happy New Year!
Bee Clip!
Wednesday, November 30, 2011
Sunday, November 27, 2011
Yummy Yuletide Recipes You Will Love
By: Jeremy White
Of all the traditions you'll embrace this Christmas season, few are as resplendent and revered as a bounteous holiday feast. A table full of family and friends with cups that runneth over truly brings joy to the occasion. Here are a handful of recipes to help with your holiday dinner preparations.
We're not chefs and space constraints do not allow us to plan your entire meal, but the recipes here are easy, time tested and will make a nice addition to the other dishes you plan to produce.
Whether you opt for ham, turkey or roast beef as your meat of choice, you won't go wrong with a side of garlic-cheese mashed potatoes. Give this recipe a whirl:
Cheesy Garlic Mashed Potatoes
3 pounds potatoes, peeled and diced
8 cloves garlic, peeled and mashed
9 tablespoons butter, softened
3/4 cup half and half
1/4 cup cheddar cheese, shredded
1/4 cup mozzarella cheese, shredded
1/4 cup Romano cheese, shredded
Salt and pepper, to taste
Halve potatoes and boil until tender, about 25 minutes. Drain and set aside. Melt butter in pan. In separate pan, bring half and half to boil and remove immediately when it begins to boil. Mash the potatoes. Beat in butter first, then half and half. Add mashed garlic and cheeses, then mix to melt cheeses. Season with salt and pepper and continue to mix until potatoes are smooth.
While you are cooking and the children are playing, you'll need a soothing drink to keep your heart warm and your spirits lively. Apple cider is perfect for this.
Hot Apple Cider
1 gallon apple cider (apple juice will work)
4 cinnamon sticks
4 whole cloves
4 allspice berries
1 orange peel, cut into strips
1 lemon peel, cut into strips
Pour cider into a large stainless steel pot. Place spices and peels into a cheesecloth. Drop cheesecloth into cider. Heat until the cider comes just short of boiling.
Remove cheesecloth and keep cider on the stovetop, over low heat. Serve warm throughout the day.
If you seek to serve a traditional feast, chances are cranberry sauce will find its way to your table. Sure, you can buy a canned sauce. No harm, no foul. If you'd prefer to make your own the day before the meal, however, here's how:
Cranberry Sauce
4 cups fresh cranberries
1 cup apple juice
1 cup honey
1 orange rind, grated
Mix cranberries, juice and honey in a pot. Cook on low heat for about 5 minutes, until cranberries pop. Remove from heat and stir in orange rind. Let cool to room temperature and refrigerate.
Lastly, it isn't a proper Christmas meal if you aren't breaking homemade bread. Try these yummy yeast rolls. It's a batter bread recipe, which is relatively quick and easy for beginning bakers!
Yeast Rolls
3/4 cup milk
1/4 cup sugar
1 teaspoon salt
4 tablespoons butter
1/2 cup warm water
2 packages instant dry yeast
1 egg
3 1/2 cups flour
Heat milk, then stir in sugar, salt and butter. Set aside and let cool. Add warm water to large bowl, then add yeast. Stir until dissolved. Add milk mixture, egg and two cups flour to the water/yeast mixture. Beat until smooth and then add remaining flour to make a soft dough. Transfer to a greased baking tray, cover with clean towel and let rise for 30 minutes. The dough will nearly double in size. After 30 minutes, punch down dough and shape into rolls. Place them back into greased baking tray and bake in preheated, 400 F oven until done (10 to 12 minutes).
Author Bio
Jeremy White, a writer for Imaginary Greetings, Inc. (www.imaginarygreetings.com), is a regular contributing author specializing in features, sports, business and food writing, and frequently contributes to a variety of print and online publications. To make your holiday display magical, visit www.holidaylighting.com.
Article Source: http://www.ArticleGeek.com
Sunday, November 6, 2011
A Sustainable Craft.
I have known Natasha for several years now, working together in health care, and I never knew how talented this young lady is. It was a chance encounter as we exchanged words on an extremely busy night in which she happened to mention, she is a Jewelry designer. Knowing how much I love hand crafted things and love to support local Artisans, I asked her if I could see her hand made jewelry. She agreed and gave me a private showing of her gallery pieces, and I have to admit she's a natural.


The official launching of Natashas' Jewelry line, Beaded Jewels,will be on November 20, 2011. Congratulations Natasha on your success. Anyone wanting to inquire about her jewelry can contact Natasha at the following: email Nillis85@yahoo.com


I have once again been inspired by the talents of everyday individuals, and Natasha has an amazing talent. It never seems to amaze me how the Lord always directs me towards individuals that are on the verge of making their dreams come true. Natasha started jewelry making as a hobby, however Natasha, has a real passion and Artisan skill to her jewelry which is now becoming a part time business as her clientele grows. My Mum always said follow your passion and you will be rewarded. And Natasha' is a perfect example of this of an individual who has followed her passion and it is just now paying off. The following photos are just a few of Natashas' pieces.


The official launching of Natashas' Jewelry line, Beaded Jewels,will be on November 20, 2011. Congratulations Natasha on your success. Anyone wanting to inquire about her jewelry can contact Natasha at the following: email Nillis85@yahoo.com
Tuesday, November 1, 2011
The True Meaning of Giving Thanks
By: J Gardener
What's not to love about Thanksgiving? It's the start of a four-day weekend. You don't have to get up too early. Sometime in the afternoon, you gather with family to share a huge, delicious meal, with guaranteed leftovers. There's football and a long nap for dad, fellowhip and fun for everyone else. Best of all, except for the food, no shopping is required to have a wonderful day. For that reason, alone, adults love Thanksgiving.
Your kids probably love it, too-a day off from school, filled with lots of treats-but they probably think of Thanksgiving like you did, when you were small; it's that holiday that falls between Halloween and Christmas. We don't wear crazy costumes for Thanksgiving, we don't receive or give gifts, as a rule. So, since kids aren't bombarded with commercials, telling them what they have to get on Thanksgiving (if they want to fit in), it can be hard for them, in our consumer-driven culture, to understand just what it's all about. After all, holidays mean presents, right?
You tell your kids about the starving Pilgrims, who were saved by the gifts of food from the local Indians, and how our country might not have developed as it did, without that act of kindness. But few of us ever mark that kindness as we down our turkey and dressing. It's odd, when you think about it. Thanksgiving is the one holiday that really is all about giving and receiving, but advertisers still haven't figured a way to stretch our credit limits to the max.
So how can you make a holiday with no presents have some real meaning for your kids? You could start with the word, itself. We often forget that Thanksgiving is a compound word-the day is meant for giving thanks. If your kids are old enough to enjoy receiving gifts and blessings, they're old enough to begin learning the concept of thanks.
Before the holiday, sit down with your children and ask them what they have in their lives that makes them happy. They may name a specific toy, or a bicycle, or a game, but chances are, when they really think about it, they'll be happy for the same things you are-family and friends, love and health and a roof over their heads. Make a list of these things with your kids-tape them on the refrigerator, or someplace where your children can be reminded of all that they have to be grateful for.
Talk to your kids about ways they can give at Thanksgiving. It's a great opportunity to teach them that giving comes in many forms. With Christmas approaching, maybe they can think about donating some of the toys they've grown tired of to charity, so that children less fortunate can have a brighter holiday. Or, if your children receive an allowance, they might want to donate a portion of it, between Thanksgiving and Christmas.
There are even volunteer activities appropriate for young children. Something as simple as a neighborhood clean-up can involve many children, with supervision. Local residents and businesses can be approached about donating toward the effort, the proceeds of which can then be sent to a charity of the childrens' choice.
Thanksgiving need not be just the holiday between Halloween and Christmas. Even to your children, it's a day that can have real meaning, and live up to its name.
Author Bio
J Gardener, a writer for Imaginary Greetings, Inc. (www.imaginarygreetings.com), is an award winning screenplay copywriter and a regular contributing author on many family oriented issues. Imaginary Greetings offers highly imaginative personalized family oriented products and services. To learn more about how to make your holiday tree magical vist www.santasornamentshop.com.
Article Source: http://www.ArticleGeek.com
Wednesday, October 5, 2011
Easy, Low-Cost DIY Costume Ideas for Halloween
By: Nikki Phipps
Let's face it, not everyone can afford to spend a lot of money on elaborate Halloween costumes, especially if you're living on a fixed income. Likewise, not everyone can afford to spend a lot of time making them either, especially those without sewing abilities. Wouldn't it be nice if you could create your own costumes with little time or money invested? Well you can. In fact, there are numerous costume ideas that can be created yourself for next to nothing. Better still, there's little or no sewing involved. All you need is a little imagination and some creativity, something most of us already have tucked away somewhere inside us. And if for some reason you don't have it, I'm sure the kids do.
An interesting way to come up with ideas for costumes is to keep a trunk or box somewhere handy and fill it with miscellaneous items. This can help spark the imagination. For instance, load it up with old clothing, fabric of varying lengths, pantyhose, fashion accessories, artificial flowers, pipe cleaners and other craft supplies, aluminum foil, yarn, old sheets or curtains, etc. Nearly anything can be used. Instead of traditional Halloween bags for candy, use other items related to your costume and store them in the 'imagination box.' For example, you can implement items such as old pocketbooks, pillowcases, garbage bags, baskets, doctor's bags, small backpacks, or even diaper bags.
Ever since my kids were old enough to participate in trick-or-treating activities, I have made their costumes. Once Halloween approaches, I begin asking them what they would like to be. Then I scour the house and our box of goodies to find whatever I might already have on hand, making a list of the items with which I need. Generally, these few items can be purchased at the local thrift shop or dollar store so there usually isn't too much money invested in the project.
For safety reasons, I prefer to use make-up or face paint as opposed to masks. You can easily make your own out of food coloring and corn starch. This is not only safer than using masks, but it's also cheaper, easier to apply, and comes off just as easily with mild soap and water. A simple cream can be made with one part corn starch and two parts food coloring to create the desired shade for your costume. Apply to the face with your fingers just like foundation. And with a few drops of red food coloring and a little corn syrup, you have home-made blood for those ghoulish costumes.
One year my daughter went as a witch. It isn't as difficult as you might think to come up with creative ways of putting this outfit together. In fact, they can be as easy or difficult as you can handle. For the witch ensemble, I simply used a tattered black dress and a witch's hat my daughter already had. I mixed up some green face paint and added a wart with an eyeliner pencil. For her hair, I used some fiery, red-orange yarn that I attached to the hat with Velcro. Add a small broom and there you go.
Another year, she was a butterfly. The butterfly was fashioned together by cutting a pair of wings out of some cardboard, which I decorated with multi-colored pieces of felt (you can also use aluminum foil and decorate with sequins, glitter, etc.). The body of the butterfly consisted of nothing more than a black sweat suit; however, a dark-colored leotard should work just as well. Wings can be attached in whatever way is easiest for you. They can be sewn onto the back of the sweatshirt or fastened with elastic bands fitted around the child's arms. You could also try using Velcro for felt-covered wings. This not only sticks to the felt but to the shirt as well. Add an antennae headband and, if desired, some face paint. The headband can either be purchased from the dollar store for a couple bucks or put together yourself using an ordinary black headband with black pipe cleaners attached.
I transformed my son into a lively jack-in-the-box one year. This idea came about through my own childhood memories. My mother also made a lot of our costumes growing up. Aluminum foil would incredibly become a tiara, a wand, or antennas. Lacy curtains would suddenly become flowing gowns. Her creativity was amazing, and one costume in particular stood out above all others-a kitchen table. She had taken a simple cardboard box, cut out a hole in the bottom, and slipped it right over my head. After draping a tablecloth over the box, my protruding head became the centerpiece with a carefully placed 'hat' made from a pair of pantyhose and artificial flowers.
And from this kitchen table costume, another one was born-the jack-in-the-box. It uses the same 'box' concept and originality. I simply took a box, decorated it, and attached it to my son with suspenders (can use elastic as well). On one side of the box I fashioned a handle. He wore dark sweatpants and a regular long-sleeved shirt that I attached ruffles to. I painted his face to mimic that of a joker.
A few years back, my kids decided that they wanted their costumes to match. We looked around the house and soon enough found ourselves with a cowboy and an Indian. For the cowboy, my son donned a cowboy hat and boots, a western shirt, blue jeans and a denim jacket. All of which we already had. To accessorize the look, I tied (loosely) a red bandana around his neck and fastened the holster (complete with toy guns) around his waist. Once again, these were items that we already had on hand.
My daughter, of course, was the Indian. Her costume was also something we had just lying around. I took an old brown pillowcase and cut a v-neck hole in the bottom that was large enough for my daughter's head to fit through. I then cut two more holes in either side for her arms. I hand-stitched designs around both the neck line and bottom of the 'dress' and with a pair of scissors, I carefully cut slits along the edges to give it a frilly look. If you don't sew, that's ok; you can easily use fabric paint to decorate the dress instead. To set off the dress, my daughter wore braided pigtails with a feathered headband around her forehead. The only item I purchased for this was a pair of moccasin slippers from the dollar store. To hold all their candy, my son carried a pillowcase 'loot bag' while my daughter used an old harvest basket lined with an orange towel.
Ever had the option of dressing up for work with the most original taking first prize? This one worked for me. Once again, I borrowed the idea from my mother, giving it my own twist-a tomato plant. For this costume, I wore a dark green leotard with green hose and slippers. I found a dark green table skirt and simply cut out holes to allow me to both slip it over my head and run my arms through. I pinned some green artificial leaves onto the leotard and table skirt along with little tomatoes made from Styrofoam balls that were painted red and topped off with green stems (you can also use tomato pin cushions found in craft stores). I finished it off with a green beret full of leaves. By the way, I took the prize.
I have found balloons to be quite useful for costumes; however, they should only be applied to those of older children or adults. Once again, safety is important and balloons tend to pop easily and small children can accidentally try to eat the balloon peices. Balloons are inexpensive and come in a wide variety of shapes, colors, and sizes. You can create one-of-a-kind costumes with hardly any work involved. Imagine a bunch of grapes (like that from Fruit-of-the-Loom). Choose a purple sweat suit or leotard and attach purple balloons carefully with small safety pins. Add some ivy vines and top it off with a matching hat full of ivy leaves. This could also be used for other berries as well with appropriate colored sweats and balloons. For instance, you could try raspberries, strawberries, or blackberries.
Then again, why not go out as Mr. Bubble? Wear white and use some white balloons to instantaneously become soap suds. Accessorize with a scrub brush and a hat or bag made up of bath materials such as sponges and empty shampoo, bubble bath, or soap containers. When you apply balloons to any costume, however, try not to put any on the backside. This could make it difficult to sit down.
Other interesting costume ideas might include a scarecrow using denim bib overalls, a plaid or flannel shirt, rope or twine for belt, a straw hat, gloves and boots. Stuff all the pockets with straw. Turn an old sheet into a ghost. Create a hobo from some old clothes and add a hat. Paint the face with a five o'clock shadow and fashion an old hankie to a stick. What's autumn without leaves? Use a dark-colored sweat suit (with hood) and pin silk leaves all over it. Walk around carrying a rake and gather candy in a leaf bag.
Remember, a little imagination can go a long way; and best of all, it's free to use.
Author Bio
This article was written by Nikki Phipps and was sponsored by DareToScare.com.
Article Source: http://www.ArticleGeek.com - Free Website Content
An Autumn Garden for Halloween
By: Nikki Phipps
There's no better time to enjoy the spectacular beauty that nature has to offer than during the autumn season. This is an ideal occasion for entertaining friends and family, especially around Halloween. Why not take advantage of all the vibrant colors and stimulating textures that autumn provides by creating a garden themed around this exciting holiday.
Halloween parties provide a great opportunity to bring the bountiful harvest from the garden indoors; or better yet, invite guests out into the garden instead. Bathe the garden or patio with soft lights. Set autumn or Halloween-colored votive candles inside small jars or glasses and place them on terra cotta saucers adorned with colorful leaves. These charming, little lanterns can be used as attractive centerpieces for tables or scattered throughout the garden.
Pumpkins are an absolute must for decorating a Halloween garden. Create a variety of Jack-O'-Lanterns and spread them throughout the surrounding landscape. Light them up with candles. You could also choose to hollow out varieties of pumpkin, gourd, and even squash to use as festive containers for cut-flower arrangements. Fill them with various mums, Chinese lanterns, stems having berries attached, sunflowers, dried peppers, twigs, etc. Wicker harvest baskets also make lovely containers. Gather a few bales of hay or straw, add some corn stalks and pumpkins, and accent with Indian corn and small decorative gourds. For additional interest, you could cover tables with old burlap sacks. Create cozy seating around these tables; or perhaps, self-contained, rock fire pits.
Autumn-themed gardens are generally rich with colors such as crimson, gold, dark green, and burnt orange. These beautiful colors result from a variety of flowers, foliage, berries and seed heads. In keeping with a traditional Halloween theme, there are several ways to accomplish a spook-tacular garden. If you desire, your focus can be centered on orange and black. However, too much dark color can result in making the garden dull and unappealing. Your goal is to achieve an inviting atmosphere. Good choices for adding orange color might include zinnias, marigolds, tiger lilies, Gerber daisies, poppies, and butterfly weed. Near-black beauties could include a variety of tulips and irises. Don't forget to throw in some orange and black-colored pansies as well.
Keep in mind, however, that a Halloween theme does not need to be limited to just these colors. Flowers that are deep maroon can also help set off your Halloween effect. Look for these shades in favorite varieties of cosmos, bachelor buttons, or snapdragons. Complimentary colors such as orange mums and purple asters can add additional interest. Mix in some gray or blue grasses.
Likewise, try implementing some dark maroon roses in the garden; allow them to climb along an old iron trellis. Place stone benches in various areas for seating, allowing different views, and maybe a nearby water basin to wash away troubles. Additionally, you might want to include plants that have creepy names such as devil's tongue, blood lily, spider orchid, bat plant, bleeding heart, bloodroot, etc.
Did you know that at one time having certain plants within your garden made you guilty of being a witch? Many types of herbs, weeds, and flowers were once considered to be used solely by witches for making up magical potions and spells. Some of these included Hellebores, lavender, poppies, dandelions, and even ferns. Foxglove, known also as witches thimbles, and yarrow, referred to as devil's nettle, are also commonly grown plants in many gardens today that have a ghoulish connection with witchcraft.
Just for fun you might consider designing a witch's garden filled with various herbs. These gardens are generally circular in shape as it was once believed a sacred symbol by witches. Plant rows of red beauties around the perimeter of the garden. Red blooms were said to keep out evil doers. Try geraniums, zinnias, nasturtiums, red spider lilies, or firecracker flowers.
On the other hand, if you're wishing to ward off a witch, try a border filled with vibrant yellows and rich greens. There are many varieties of flowers such as marigolds, sunflowers, green zinnias, etc. and foliage plants such as hostas, ornamental grasses, or evergreens that will achieve this effect easily. Within the witch's garden you may find an array of native plants.
Add further interest and drama by incorporating ornamental plants as well. Enhance your theme with various features such as gargoyles, toadstool ornaments, broomsticks, and small cauldrons. Allow these objects to crawl out from beneath or behind plants to create an air of mystery.
An autumn garden can easily be designed to fit a Halloween theme. With only a dash of imagination and a few Halloween-related props, you can create an autumn garden that will amaze your family, friends, and neighbors. Happy Halloween.
Author Bio
This article was written by Nikki Phipps and was sponsored by DareToScare.com.
Article Source: http://www.ArticleGeek.com - Free Website Content
Halloween Activities for Kids
By: Nikki Phipps
There's no doubt about it; kids love Halloween. They love dressing up in costumes and collecting loads of candy. But did you know that kids also enjoy participating in other fun, creative activities as well? There are tons of interesting ways to entertain a child's imagination, including simple craft projects and games. Why not take advantage of this amazing holiday by spending some extra time with the children and doing these activities together?
Craft projects are a great way to get your child involved with Halloween traditions. Children love the chance to use and show off their imagination. Why not allow them to help out with the Halloween decorations? Sure, you could go out and spend lots of money on decorations that are already assembled, but wouldn't it be nice to save some cash by making your own? And as a bonus, you get to share the moment with your children.
Here's a nifty idea for adding Halloween charm to your porch or patio. Thoroughly clean and remove the labels from empty 2-liter pop bottles and pour a little bit of orange paint inside, replacing lid afterward. Let the kids shake the bottles around until the inside is covered with orange paint. Once dry, allow them to decorate faces onto the outside of the bottles with black paint. Add a green ribbon or bow to the top of the bottle and set on the porch. To lessen the chance of your pop-bottle pumpkins from blowing over, you can add a handful of sand using a funnel.
Another fun project for the kids involves making pumpkin pouches from ordinary paper plates. These creative little pouches will look great hung on the wall or door. Use them for holding candy or other items. In fact, use them all year long. They can easily be created to change as the seasons do. Take two plates and cut one in half. Secure the half plate onto the whole one using either staples or weaving ribbon through punched-out holes. Paint the plate pouch orange and allow it to dry. Decorate the pumpkin with funny or spooky faces and hang (pouch out). You could also have the kids create a festive Halloween handprint wreath for hanging on the front door. Choose autumn-colored pieces of construction paper and trace around your child's hand. Cut the little hands out and glue them together in the shape of a wreath. These can be further decorated or left as is. The size of the wreath is up to you.
Planning a party? Get the kids to help out with the invitations. Create adorable ghost print cards using their own footprints. Your children will not only enjoy making them, but your guests will love the cute designs as well. Simply grab some black and orange-colored construction paper (amount will vary depending on how many people), white tempera or other washable paint, and some gold gel markers. Lay down some newspaper and fill a shallow container with paint. Fold each piece of construction paper in half and place, one at a time, onto the newspaper. Have each child dip his/her foot into the paint and 'stamp' the card with a footprint. Allow the cards to dry; afterward, let the kids add a face onto the ghost and print a small message inside using markers. You could use glue for this instead and decorate with glitter.
You could attach some lively little ghost pops onto each card. Just have the children cover a tootsie pop with tissue and secure it in place with a piece of orange or black yarn. Use a marker to add a face to the ghost. These also make fun treats to give out to the trick-or-treaters.
Other interesting ideas for the kids to make and give out to party guests as well as trick-or-treaters include bat bags and candy cups. Use an ordinary brown paper lunch bag and some brown construction paper. Have the kids draw a bat's head onto the piece of construction paper and cut it out. Let them decorate it with markers, glitter, etc. Fill the bag with treats, fold the top over, and staple (parent/adult should do this). Of course, you don't need to feel limited to bats; allow them to choose whatever Halloween design they want or one that goes with a party theme.
Candy cups are good for party guests. Simply allow kids to decorate Styrofoam cups with markers relating to Halloween theme. Meanwhile, fill some plastic baggies with individually wrapped candy and tie the tops with decorative yarn or ribbon. Let the kids drop one baggie into each of the cups; these can also contain the names of guests or allow the guests to become involved as well and include the activity as a party event.
While children are always fascinated with creative craft projects, they simply love the opportunity to play. Games are another fun way for them to enjoy the Halloween festivities. Traditional games such as Snap Apple are always a hit. Hang an apple from the doorway with a string and have the children take turns trying to bite the apple, with their hands behind their back. This game was thought to bring good fortunes to those accomplishing the task. Of course, you could give a prize instead.
An interesting alternative to the more traditional Halloween games might include a good old-fashioned game of Pin the Nose on the Pumpkin. This game is played in the same way as Pin the Tail on the Donkey. Create a pumpkin from a piece of orange poster board and draw a mouth and eyes onto it with black marker. Create the nose from a piece of black poster board or construction paper and attach some double-sided tape to the back of it. Blindfold the players, having them turn around a couple of times, then allow them to 'pin' the nose onto the pumpkin. Winner gets a small prize.
Halloween isn't just about the candy or the costumes; nor is it about the ghosts, goblins, or witches. Halloween is an ideal occasion for spending and honoring time with family and friends. From small decorating projects to fun games, the Halloween season offers plenty of easy and interesting activities for the kids as well as the parents.
Author Bio
This article was written by Nikki Phipps and was sponsored by DareToScare.com.
Article Source: http://www.ArticleGeek.com
Saturday, September 24, 2011
Just an amazing site!
I came across this web site, and I have to admit it's amazing. Phil Nauta is the smiling gardener, but with all his helpful tips and videos the one's who will be smiling are the one who follow his advice.
Check his site out I bet you'll learn something new, I know I did. Www.smilingGardener.com

Source: Smiling Gardener
Check his site out I bet you'll learn something new, I know I did. Www.smilingGardener.com
Source: Smiling Gardener
Friday, September 2, 2011
It Bee All about You.
I have been working on establishing an urban farm yard for over a year now. It will always be a work in progress. As change is the never ending processes of a garden. What started out as seeds grows into fruit yielding plants. Which with the changing season will have then served their purpose wilt and be added to the compost bins for next years black gold. The continuous cycle of reusable fertilizer the life of a garden. Nevertheless, it is nice to know that their are like minds out there with the same passion of the natural world who keep me inspired. The following pictures come to me from a fellow beekeeper who's has been at this much longer than I have. From Cape Cod, Massachusetts fellow beekeeper Mr. Murphy raises chickens, grows vegetables and is a beekeeper on his quarter acre.


 Hoping these pictures will inspire you as they have me. Thank you Mr. Murphy for sharing your world with.us, and thank you for keeping it green.


Tuesday, August 30, 2011
There She Blows!
My love of the natural world was forged at an early age. My mother is always telling my wife stories of how I, as child would run off and play in the bushes instead of playing on the playground. It was always about the scavenger hunt for me. I was always looking for a new bug or little critter to bring home. My moms favorite story is how I, on one winter afternoon decided to bring home a jar of carpenter bees which I had accidentally unearth, and didn't want them to die, therefore I re-homed them in my parents bedroom. Needless to say, my parents were not pleased with my intent in saving the bees. Till this day i am afriad I am not quite sure of whatever became of those bees, I never dared to ask!
However, as hurricane Irene tore through the east cost I was again in a situation where I had to save the bees. I had to admit when I decided to create my urban farm yard, keeping chickens and becoming a beekeeper, the thought of a hurricane never entered my mind. But now the threat was real. Irene was coming, and all my hard work was in real danger. I knew from the News forecast that Irene would be heading straight for us. My wife and I knew we had our work cut out for us, and no time to waste. Getting our home ready for a hurricane is one thing, but when you have livestock in an urban setting this becomes a whole other matter. I don't think a city shelter was ready for us and our livestock. Imagine the conversation with the evacuation shelter when I ask them if they have room for two adults with chickens and 10,000 bees. I don't think a conversation like this would of faired very well.
The first thing I did was to make sure our home was not situated in a flood zone. Thankfully we are not, however that's never a guaranty we wouldn't be flooded. But it's a start. I moved the bees to the highest point on our property and anchored them down with cinderblocks to keep them from being blown away. Then crossed my fingers and prayed! I then had to secure the hens. Those little ladies spent a good part of the hurricane in dog kennels which we had kept from previous pet dogs we had owned. They were then moved from their coop and temporarily occupied one of the vacant bedrooms which I have yet to renovate. Yes, thats right I had to bring in the chickens! OMG!, I think they believed they were being crated up for the butcher the way they were clucking!
Now that the livestock was secured. We had to get the house ready for the storm. We had to make sure we had enough food and water for the both of us and the hens. Made sure the car had a full tank of gas just in case we did have to evacuate. However the current plan was to wait out this storm at home. So then began the waiting game!
I can't say I wasn't worried , the truth of the matter is, I was! New York hasn't seen a hurricane of this magnitude since hurricane Gloria, and I remember all the damage she did when she payed us a visit. Our home was built in 1899, and she's no stranger to hurricanes. However, I Had my reservations. We'd soon find out, as hurricane Irene was only 7 hours away.
There she blows,Irene finally reached us. She dumped about 12 inches of rain on us, but I suspect more. I can say this with gusto as I am the proud owner of a new in door swimming pool in our basement, as a result of hurricane Irene. With wind speed of 56mpr, wind gusts of 65 Irene hammered Staten Island. We slept in our living room, as the storm had her way with us. All we could do is wait her out, prayed a lot and hoped for the best.
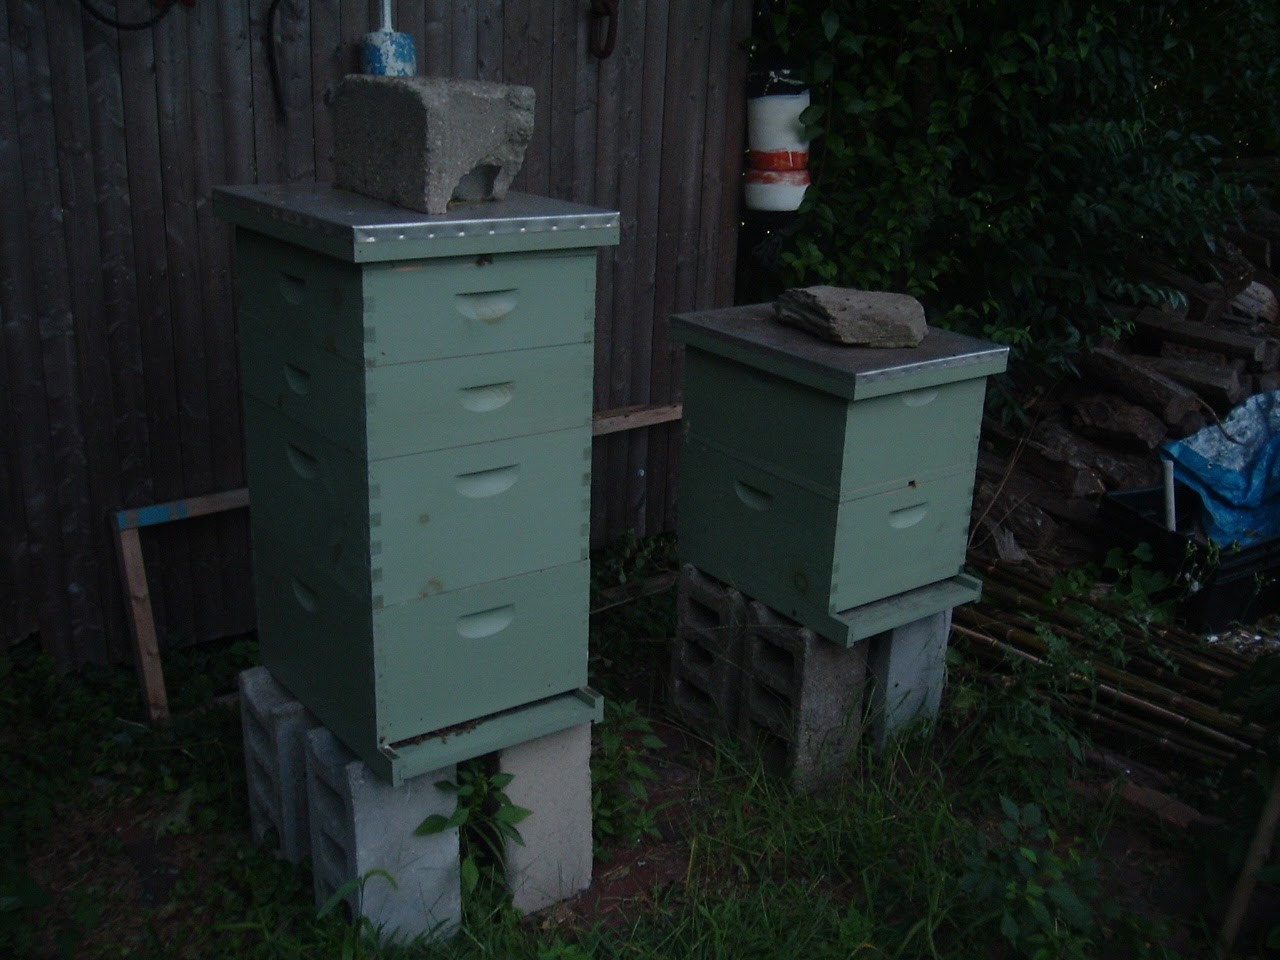
It was 4 a.m., when I remembered the bees. I wondered if the cinderblocks I had placed on top of them had been enough to keep them from blowing over. I made my way to the kitchen window which has the best view of the hive. At first all I could see is trees swaying back and forth as if they had received the Holy Spirit on Sunday mass. Then I saw it in the distance, a small little brown box, held down by the weight of those concrete blocks. I couldn't help but feel overjoyed, at least for the moment they were ok. But we still had several hours of storm yet to pass.
Then thankfully, it was over ten hours later. We'd had made through this storm unharmed and stepped outside to survey any damages caused by Irene to our property. The worse we had received was the flooding in the basement. I considered ourselves blessed with that alone. The bees road out the storm just fine, and the hens were glad to get out of the those pens and forage through the landscape once again.
All and all I was thankful that this storm gave us a pardon. However, we may not be so blessed for the next one. Yet I am some what grateful to Irene, for with out her threat and other storms such as her, I would have never known what it takes to prepare an urban farm for disasters such as these. It has given me a better perspective on disaster preparation.
However, as hurricane Irene tore through the east cost I was again in a situation where I had to save the bees. I had to admit when I decided to create my urban farm yard, keeping chickens and becoming a beekeeper, the thought of a hurricane never entered my mind. But now the threat was real. Irene was coming, and all my hard work was in real danger. I knew from the News forecast that Irene would be heading straight for us. My wife and I knew we had our work cut out for us, and no time to waste. Getting our home ready for a hurricane is one thing, but when you have livestock in an urban setting this becomes a whole other matter. I don't think a city shelter was ready for us and our livestock. Imagine the conversation with the evacuation shelter when I ask them if they have room for two adults with chickens and 10,000 bees. I don't think a conversation like this would of faired very well.
The first thing I did was to make sure our home was not situated in a flood zone. Thankfully we are not, however that's never a guaranty we wouldn't be flooded. But it's a start. I moved the bees to the highest point on our property and anchored them down with cinderblocks to keep them from being blown away. Then crossed my fingers and prayed! I then had to secure the hens. Those little ladies spent a good part of the hurricane in dog kennels which we had kept from previous pet dogs we had owned. They were then moved from their coop and temporarily occupied one of the vacant bedrooms which I have yet to renovate. Yes, thats right I had to bring in the chickens! OMG!, I think they believed they were being crated up for the butcher the way they were clucking!
Now that the livestock was secured. We had to get the house ready for the storm. We had to make sure we had enough food and water for the both of us and the hens. Made sure the car had a full tank of gas just in case we did have to evacuate. However the current plan was to wait out this storm at home. So then began the waiting game!
I can't say I wasn't worried , the truth of the matter is, I was! New York hasn't seen a hurricane of this magnitude since hurricane Gloria, and I remember all the damage she did when she payed us a visit. Our home was built in 1899, and she's no stranger to hurricanes. However, I Had my reservations. We'd soon find out, as hurricane Irene was only 7 hours away.
There she blows,Irene finally reached us. She dumped about 12 inches of rain on us, but I suspect more. I can say this with gusto as I am the proud owner of a new in door swimming pool in our basement, as a result of hurricane Irene. With wind speed of 56mpr, wind gusts of 65 Irene hammered Staten Island. We slept in our living room, as the storm had her way with us. All we could do is wait her out, prayed a lot and hoped for the best.
It was 4 a.m., when I remembered the bees. I wondered if the cinderblocks I had placed on top of them had been enough to keep them from blowing over. I made my way to the kitchen window which has the best view of the hive. At first all I could see is trees swaying back and forth as if they had received the Holy Spirit on Sunday mass. Then I saw it in the distance, a small little brown box, held down by the weight of those concrete blocks. I couldn't help but feel overjoyed, at least for the moment they were ok. But we still had several hours of storm yet to pass.
Then thankfully, it was over ten hours later. We'd had made through this storm unharmed and stepped outside to survey any damages caused by Irene to our property. The worse we had received was the flooding in the basement. I considered ourselves blessed with that alone. The bees road out the storm just fine, and the hens were glad to get out of the those pens and forage through the landscape once again.
All and all I was thankful that this storm gave us a pardon. However, we may not be so blessed for the next one. Yet I am some what grateful to Irene, for with out her threat and other storms such as her, I would have never known what it takes to prepare an urban farm for disasters such as these. It has given me a better perspective on disaster preparation.
Thursday, August 18, 2011
Old-Time Favorites: Plants for Your Garden Worth Remembering
Old-Time Favorites: Plants for Your Garden Worth Remembering
By: Nikki Phipps
Remember the almost magical feeling of your grandmother's garden, bursting with loads of colorful, fragrant blooms and magnificent foliage? There was always something going on in the garden; and nearly every plant had a specific purpose, whether it was for the kitchen, treating ailments, or keeping up appearances.
Gardeners of the past created beautiful landscapes with many of the same plants commonly seen today. Heirloom plants are quite hardy, and many of these vintage flowers have managed to survive on their own throughout centuries, while others have been cultivated into more modern varieties. Nonetheless, these old-time favorites are worth remembering so why not rediscover the past by incorporating some old-fashioned beauties into your own garden.
One of my personal favorites has been around since about the 17th century. A spectacular showpiece during the spring, the Lilac has sweet-smelling lavender blossoms. Today, there are numerous cultivars available, including some with yellow or white flowers.
Another exceptional plant in its own right is the rose. The modern varieties are typically grown for their form and color; however, the old-garden varieties, such as Tea or Damask roses, are sought after for their intense aromas. While these traditional favorites tend to be more like shrubs and very thorny, they combine well with many perennials, bulbs, and ornamental grasses. Old-garden roses are always the perfect choice for country or cottage gardens.
There are many types of plants that are grown for their fragrances. Creeping Thyme is one of them. This beautiful groundcover creates a carpet of scented lavender-pink color and looks just as attractive spilling over stone walls or containers. Keep it near the house for use in the kitchen or making potpourri.
You can even grow Creeping Thyme alongside another fragrant old-timer-Lavender, my grandmother's favorite. Varieties of lavender include unforgettable scents with spikes of lavender to dark purple flowers. Lavender also makes a great groundcover and commonly used in potpourri or massage oils.
Garden Heliotrope was once just as popular in the garden as geraniums. These plants, with white or purple vanilla-scented blooms, enjoy plenty of sun and make lovely cut flowers. Who can possibly ignore the sweet aromas on summer evenings radiating from a bed of Petunias? There are numerous colors and varieties, all providing the same charm of long ago.
The Sweet Pea has been a long-time favorite in many gardens. This flower is great for cutting and its strong scents will fill the area with pleasant aromas. Although sweet peas generally prefer cool summers and plenty of moisture, there are many varieties which are heat tolerant, allowing virtually anyone the ability to grow them.
Feverfew not only smells great, but did you know that its foliage can repel insects, making them a good plant to have around. The plant looks quite at home mixed with old-time roses and foxgloves.
I have always enjoyed the honey-scented blooms of Sweet Alyssum. It makes a perfect edging for beds and blends nicely with nearly any type of landscape.
Since many old-fashioned gardens were surrounded by fencing, flowering vines were often used to enhance its appearance. They were also used in other areas to help provide much needed shade. Dating back to the 1800s, Clematis has long since been known as a vigorous grower with abundant blooms. Don't limit them to fences; however, they look stunning climbing along a trellis or pergola.
The Passion flower can be traced as far back as the 1600s and has religious significance, deriving its name from the crucifixion of Christ. This lovely flowering vine produces masses of scented blooms bearing luscious fruits, and many grow naturally in some areas.
The Balloon Vine (love-in-a-puff) was a commonly grown plant in the 1800s, delighting children with its light-green, inflated seed capsules (puffs) that appear after the vine's white flowers have faded.
While some people may not appreciate its presence, due to its ability to climb anything within reach, the Morning Glory is another unforgettable plant. Morning glories are easy to grow and thrive in all types of soil conditions. Although they can be found growing in the wild, the cultivated varieties are less likely to take over the garden. These beautiful morning bloomers make quite a statement summer through fall-what a wonderful way to welcome each new day.
Numerous annuals and perennials were found growing throughout old-fashioned gardens. As far back as the 1800s, Ageratum has been a garden favorite. The long-lasting, fuzzy blue flowers are great for cutting. It's also a self-sowing plant, popping up in some of the most unlikely of places. Plant them with Heliotrope and sweet alyssum; you won't be disappointed.
Poppies are hardy, cool-weather annuals that are easy to grow. These old-time plants prefer fertile, well-drained soil and come in numerous shades and varieties.
Once grown for its edible properties, especially for salads, Nasturtiums are among the easiest annuals to grow. You can find them in a variety of colors which will bloom profusely for extended periods. Trailing varieties look great in containers or tumbling down slopes; the compact types are good for use as edging.
An old-time favorite loved for its brilliant foliage is Coleus. This plant is ideal for containers or as a colorful edging.
No garden is ever complete without Zinnias. These colorful showstoppers are excellent for cut-flower gardens.
The interesting flowers and foliage of Foxgloves earn these plants a welcome place in the garden; however, foxgloves are considered poisonous so keep young children away.
One look in grandma's garden and you're sure to find some old-fashioned Hollyhocks. These summer-blooming beauties have found popularity in informal country settings or growing alongside fences and other structures.
Violets have been around awhile and well loved for some time. They make a good groundcover or grow them in containers.
Columbine has been popular since about the 1600s and can be found in white, pink, or blue varieties. Use them as cut flowers or simply mix them in a natural setting with hosta, iris, foxglove, and lady's mantle.
Another personal favorite of mine includes the mixed shades of Sweet William. This perennial flower goes well with many plants, such as foxgloves and peonies.
Some of the most beloved flower favorites come in the form of bulbs and many are ideal for cutting. Dahlias have lavish blooms during late summer and early fall and are available in a variety of colors.
Who doesn't enjoy the lovely blooms and aromas of the Iris? There are numerous varieties to suit nearly any garden.
Another old-time favorite with a wide range of colors and growing conditions is the Lily. Lilies have a long history and have been grown for centuries.
Cannas have also been popular for their dazzling array of colors. Plant them in masses and enjoy waves of colorful blooms summer through fall.
Some of the best plants for your garden, big or small, can be taken from the old-fashioned gardens of the past. These plants have lasted through many generations; and if you want to capture the nostalgia of grandmother's garden in your own, they will continue to do so for many more.
Author Bio
This article was written by Nikki Phipps and sponsored by Gardening Know How. http://www.gardeningknowhow.com/.
Article Source: http://www.articlegeek.com/
Soap Making Can Be Fun And Profitable
Soap Making Can Be Fun And Profitable
By: Ralph Ruckman
If you have ever made soap from scratch or are thinking about it, you should probably know that it can be one of the most frustrating things you will ever do. After learning the process though, a lot of people find it to be one of the best hobbies or crafts they have ever done. Soap making can be a hobby for people, but it can also turn out to be a very profitable business. Before you go rushing into thinking that you are going to just create this beautiful and profitable soap making business, you had better look at some the important features regarding this business.
The most important feature of a soap making business is going to be the legal disclaimers. You had better know what you are doing when you create your handmade soap. People can not just go out and buy the necessary materials, whip out a batch of soap, and then proceed to marketing or selling it. You have a lot of disclaimers and in some states, laws that you have to abide be. Each state, region, and country is different, so it is up to you to do your proper research on the matter and to complete all the paperwork necessary for you to proceed with your soap making business.
After you have cleared all of the legal necessities out of the way, it is all systems go for your business. Now you will have to think about your time planning. Time planning will be crucial to your business, as everyone that has made soap knows that it is a tedious process. Set yourself a schedule up and follow it. If you have soap curing, take the time to start mixing yourself another batch. By having a continuing process, you will be able to produce more soap and not fall behind, which will only lead to confusion and frustration.
Now that you have gotten all the legal stuff out of the way, and you have a good amount of soap made, it is time for you to sell your soap. People who sell soap are only limited by their imagination. Craft fairs are huge for soap sellers. Travel to a craft show and set up a booth to present and sell your soap. Not only can you make good money from this, but you can also get tons of ideas for more soap. People stopping by your booth will critique your soap. They will tell you what they do or do not like about it. Always accept the compliments, even if they seem rude. This is "critique" and it can either "make" or break" you.
Bath and Body work shops are a huge fan of soaps. Some of these store will allow a person to present their soaps inside their stores. This is where the legal disclaimers come in. You will not even get a blink from the manager if you do not have your legal paperwork. Also, this may cost you a fee to present your soaps in the bath shops. Always research and think the deal over before making your decision. If you do present your soaps in these shops, this can be huge. Try to provide some type of business card, or a website address about your soaps. Word of mouth is an enormous tool, and in bath shops it can be a viral one. You may not be able to sell your soaps in the store, but a nice presentation can yield results overnight that you never would have thought of.
Online advertising for your soap business is not vital, but it could be if you are not quite cutting it in the "real world". Just think of the possible number of people you could reach with your soaps. The numbers are endless. Have a nice little website set up showing all of your soaps. A first impression of your site is the critical part of advertising online. This will decide if a single person will ever return. It is good to have a description along with your soap pictures. You could explain what ingredients are in the soap, what fragrances are in them, etc...
These are only a few things you could do for a soap making business. This is assuming that either you know how to make soap or that you take the necessary steps to successful soap making. Once you have reached that point of success it will be time for you to think about broadening your horizons. A soap making business can be a very lucrative field for anyone to get into. Types of soap to make are endless, and the amount of money to earn is only limited to your willingness to make the soap and put it in front of the eyes of people.
Author Bio
Ralph Ruckman is the author of "Soap Making" a weblog dedicated for providing information on all aspects of soap making. Feel Free to visit the blog at: soap--making.blogspot.com Article is available for reprint as long as the author bio/resource text is left intact with the article.
Article Source: http://www.articlegeek.com/
The Effect of Fish Oil on Fat Burning
The Effect of Fish Oil on Fat Burning
By: David Woynarowski, M.D.
I have written many emails over the years on the effect of fish oil on fat burning.
Lately there has been corroborating scientific evidence that fish oil can reduce belly fat and aid in fat burning as part of a solid diet and exercise program. But still I get questions like the one below.
"Doc, I have read some of the stuff in your articles archive. I don't understand how fat can burn fat. It just does not make sense." William Hennessey Kansas City.
Yikes! This could be one of those god-awful scientific emails. Ok I promise to keep it clean after all you've got enough on your plate.
Here's the deal. All foods have effects on the hormone systems of the body. Some foods like fish oils actually behave like hormones in that they affect all kinds of other things from your genetic material to your proteins and other hormones. Fish Oils especialy influence the way the cell behaves at an individual level.
On that level, fish oil helps to gets cells to take in more fat and become more able to use that fat as fuel.
Most of the fish oil you take has far more effect on these cellular and hormone systems than it ever has on your calorie intake.
Hence when someone asks me the inevitable, "Won't I get fat on fish Oil since it's a fat?" question, I can always say, "Nope" with confidence. But there is another simple way to tell that fish oil is working for you. If and when you go to get your cholesterol checked you will usually see a couple of things on Fish Oil if it's high quality.
First, your good cholesterol will go up. Very good. Next your triglycerides will go down. What are triglycerides? Raw fat in transit. This is the way your body moves fat through your bloodstream. Whether you export it (burn it up as fuel in your cells) or import it into your arteries to clog them depends a heck of a lot on how much fish oil you have in your system at the time.
So remember, when you eat a lousy meal, pop some extra fish oil! Here is what happens to those ugly, nasty, artery clogging fats if you do: "Doc, Just wanted to let you know the results of my most recent blood tests. I am 61 years old and have been on Lipitor for the past 9 months. I have been taking your fish oil capsules for two months. My doctor's office called yesterday to inform me of the results of my blood work done last week. They just said it was great. I asked to please let me know the differences from the last tests 6 months ago. My total cholesterol dropped from 158 to 149. The improvement was due to lower LDL, but the exciting numbers were the drop in triglycerides. My triglycerides have always been high. The test 6 months ago had me at 218, this latest one was 109. Cut in half!!
The doctor's office asked what I was doing differently. I said 3 things. Two bad one good. I had not exercised in 8 months and had gained 8 pounds, but I started taking your pharmaceutical grade fish oil. They were impressed as I was. Now everyone in my office wants to get on the bandwagon. We are buying a case today!!!"
Best regards,
Rick McNeil
Plano, TX
Good job Rick and thanks for taking the time to share with us. Remember you can burn fat with the right kind of supplements. Fish oil rules! All the best form the King of Pharmaceutical Grade fish Oil, Dr. Dave.
Author Bio
Dr Dave's Best.com was founded in Nov of 2002 in order to answer the growing need for high quality nutritional supplements and supplement solutions to the vast array of problems that Dr Dave sees on a daily basis, and to provide anti-aging information to the public in an understandable format.
To read more about Dr Dave, Click Here.
Article Source: http://www.ArticleGeek.com
Sunday, August 14, 2011
The Savvy Gardener.
For all those savvy gardeners out there who read my blog page this one's for you. I have been working on a new project here on my urban farm which I am extremely excited about. However before I get to this project let me give an updated status on the progress on my little patch of green Earth.
It's almost the middle of August and summer will be taking its' hiatus and fall will soon be taking its place. Soon the trees will being to change color and the day's will be getting shorter and nights longer. In its wake of summer's end their will be remnants of something which was grown on this urban farm. I will fill my compost bins full of decaying matter for next years vegetable production. Yet their is still time to plant a fall crop to harvest later on this season. A planting of lettuce, broccoli, garlic and any other cold crop can be planted before this winter sets in. The chickens are doing great as always. Their in full laying mode, and they are loving their new home. This is the hens second summer with us and they have given us a good amount of eggs this summer more than we are able to eat. So I will be giving some away to friends and neighbors to share in our reaping.
Since the arrival of the bee's I finally have fruit on my plants. The tomatoes, squash and cucumbers have all given me a production of nice sized fruit. All this has been made possible because I decided to maintain a bee hive on my property. I can't believe how much of a difference in the production of edible fruit there is now that the honey bee's are here. Three weeks ago I had nothing, just flowers no fruit. Now I have tomato plants toppling over from the weight of all the fruit it bears, along with squash the size of my forearm. It just goes to show you the importance of having bee's in the world, for with out them we'd starve.
Now for my latest project. I am still working towards having a working propagation nursery here on my Urban farm. The lavenders are all lined out and are growing out nicely. Yet, I still feel that somethings missing. Their is a lot of talk on CNN about the American economy, and how it is getting worse. It just makes me sick to my stomach when I see friends and family losing jobs and their homes because of bad management of American Funds. I guess we can all share in the blame. Still I can't sit here and do nothing, watching the news doesn't help either. It is up to us, the little people, those of us who think radically and outside the box who will lead the forefront in rejuvenating this economy. I will not rest until I do my part in achieving this goal. I will create my own stimulus package. Instead of being part of the problem I will focus on being part of the solution. I have been in open conversations with a few nursery growers that I have had the pleasure of working with in the past and I have come to realize in one of those conversations that this blog was missing something. What I have decided to do is add a link that will direct you to my online store which is currently under consturction and will be found in the next couple of weeks on the upper left corner of this Blog page, titled "The Sustainable On line Store". There you will find affordable garden plants to add value to your homes or to give away as gift. Creating the garden of your dreams doesn't have be expensive. Most DIYer's get their landscaping done on a budget, even though it may look like they spent hundreds on it. If you are a frugal gardener such as myself then you will love the deals on this page. If however, their is a special plant or shrub you can't located or you haven't purchased one because the price is to high, drop me a comment and I will see if I can get it listed on my web page at a more economical price. As always trying to keep it green on a modest buget. And again this will be a work in progress stay tuned and look for the Link.
Thursday, July 28, 2011
Sustainable Buzz
I can't believe it, they are finally here, my urban farm yard is complete. My wife and I drove to Summit New Jersey, to pay a visit to Patrica and Alex's bee yard. I have to admit I was very much impressed to see the amount of hives they currently maintained on their property. There had to be at least 20 hives which I think I managed to count, I may have missed a few because I felt like a kid in a candy store. What impressed me the most is how calm the bee's were. The honey bee's did not seemed bothered by our presence. They just kept buzzing in and out of the bee yard foraging for nectar and pollen. Everywhere we looked a sea of flowers. Patrica's home is landscaped from corner to corner in an assortment of blooming purple and white wild flowers, vegetable plants and grape vines. It resembles a country cottage, the kind you would see on a Hallmark card.

As my wife and I sat there, we observed as the honey bee's buzzed by, not once did we feel threaten by their presence, it was almost zen, peaceful. I watch as my wife sat there as clam and could be. Not once did she go running through the hills like some mad women. You need to understand that my wife has an extreme fear of insects. However, I was pleasantly surprised at her stillness, as we both watched the bee's in their natural state.
A few minutes later Alex arrived, as he walked up to the porch he greeted us as if he known us forever. He's a most pleasant individual, he took his time with us, explaining and giving us his take on beekeeping, then he asked me what type of bee's I wanted. He asked, "Black or Orange?" Of course I said, "What......?" He repeated himself, "Black of Orange?" Then I realized he was asking me if I preferred a dark color body type to light color body type. Since I didn't want to look completely stupid, I went for the Orange color body type, because this the only bee type I know, which is the Italian bee. He said, "Good, get your box". As I went back to our car to retrieve the my hive box I could help but be full of gitty excitement, then Alex led both of us, my wife and I, to the bee yard.
My wife stood about 12 feet away, just in case she needed to run, smart woman, my wife. Yes, now that's the wife I know, I knew her stillness would not last long, it was just a matter of time. I on the other hand, had a front row seat smack in the middle of Alex's bee yard. Alex asked me to open my hive box, as he lit his smoker. He then puffed some smoke into a nuc box which contained the orange bodied bee's which I had requested. (The Italians) My back was turned to him as I opened my hive box to receive the bee's, so I was a bit distracted. Then I realized I was now surrounded by massive amounts of buzzing bee's flying passed my head and I had no bee suite or veil. I should have been running down the street as a mad man. But some how Alex seem to be as calm as a cucumber as he picked up a frame he then began to point out the worker bee's and the larva. He pointed out young bee's to distinguish them from the older ones. Next he picked up another frame pointed out the Queen. I have to admit this whole experience was extremely cool. To be that close to bee's without getting stung, well that was truly amazing. His peaceful manner in handling the bee's made me feel safe, therefore I was as calm as he was. He then placed all four frames into my hive box puffed more smoke into the hive and soon all the bee's settled into their new home.
I have to admit I was pretty excite about the whole process. As Alex help me place the hive in the car, I could not help but to think, "I hope I can maintain these bee's as well as Alex has done". I thanked Alex for his hospitality, we shook hands and said I would keep in touch. As I sat in the car my wife gave me a glance, as a reminder that we have a car full of bee's in our back seat. We looked at each other without saying a word, we both were thinking the same thing, "What were we thinking!" We laughed, and said, "Well lets take the little one's home!" And so begins our first attempt towards a sustainable honey production.
So I want to take the opportunity to thank both of you, Alex and Patrica, for your time and for making this beekeeping adventure possible. For without both of you this could never have been possible. Thank you again.

We had arrived at their home earlier than expected, it was a pleasant drive from Staten Island. Patrica greeted us with the utmost hospitality and was very gracious. She gave us a tour of their garden and then showed us through their bee yard. She told us what she knew of about the bee's but then explained it was her husband Alex which is the gardener and beekeeper, she chuckled and said comically, "Every time I come home, I don't know what else to expected, as Alex keeps bring something new home!" She's then invited us to sit on their porch while we awaited the arrival of her husband Alex.
As my wife and I sat there, we observed as the honey bee's buzzed by, not once did we feel threaten by their presence, it was almost zen, peaceful. I watch as my wife sat there as clam and could be. Not once did she go running through the hills like some mad women. You need to understand that my wife has an extreme fear of insects. However, I was pleasantly surprised at her stillness, as we both watched the bee's in their natural state.
A few minutes later Alex arrived, as he walked up to the porch he greeted us as if he known us forever. He's a most pleasant individual, he took his time with us, explaining and giving us his take on beekeeping, then he asked me what type of bee's I wanted. He asked, "Black or Orange?" Of course I said, "What......?" He repeated himself, "Black of Orange?" Then I realized he was asking me if I preferred a dark color body type to light color body type. Since I didn't want to look completely stupid, I went for the Orange color body type, because this the only bee type I know, which is the Italian bee. He said, "Good, get your box". As I went back to our car to retrieve the my hive box I could help but be full of gitty excitement, then Alex led both of us, my wife and I, to the bee yard.
My wife stood about 12 feet away, just in case she needed to run, smart woman, my wife. Yes, now that's the wife I know, I knew her stillness would not last long, it was just a matter of time. I on the other hand, had a front row seat smack in the middle of Alex's bee yard. Alex asked me to open my hive box, as he lit his smoker. He then puffed some smoke into a nuc box which contained the orange bodied bee's which I had requested. (The Italians) My back was turned to him as I opened my hive box to receive the bee's, so I was a bit distracted. Then I realized I was now surrounded by massive amounts of buzzing bee's flying passed my head and I had no bee suite or veil. I should have been running down the street as a mad man. But some how Alex seem to be as calm as a cucumber as he picked up a frame he then began to point out the worker bee's and the larva. He pointed out young bee's to distinguish them from the older ones. Next he picked up another frame pointed out the Queen. I have to admit this whole experience was extremely cool. To be that close to bee's without getting stung, well that was truly amazing. His peaceful manner in handling the bee's made me feel safe, therefore I was as calm as he was. He then placed all four frames into my hive box puffed more smoke into the hive and soon all the bee's settled into their new home.
I have to admit I was pretty excite about the whole process. As Alex help me place the hive in the car, I could not help but to think, "I hope I can maintain these bee's as well as Alex has done". I thanked Alex for his hospitality, we shook hands and said I would keep in touch. As I sat in the car my wife gave me a glance, as a reminder that we have a car full of bee's in our back seat. We looked at each other without saying a word, we both were thinking the same thing, "What were we thinking!" We laughed, and said, "Well lets take the little one's home!" And so begins our first attempt towards a sustainable honey production.
So I want to take the opportunity to thank both of you, Alex and Patrica, for your time and for making this beekeeping adventure possible. For without both of you this could never have been possible. Thank you again.
Tuesday, July 26, 2011
Sustainable Partnerships.
I finally received my bee hives in the mail. The first hive I purchased through Clear Branch Bee Supply, it is my first starter hive, I am pleased with the quality, construction and speed in which it was delivered to me. I made a few Modifications to this hive in order to use it as my transporting box when I purchase the nuc later this week. However it looks like I will many year of use from this hive, will be ordering more from them. I put it together with the help of my 5 year old niece, who insisted on helping me. So what would have taken me and hour and a half to finish, took me six hours with her help, but who could say no to an eagar beaver like my niece. She's such a curious George that one. Having to stop and explain every step in the process of building the hive, why bees live in a box, how many live in the box and when we would collect the honey! Her curiosity is why I always allow her to participate these kind of projects. Her interest in these projects will enabler to gain a love and respect for nature at any early age, and hopefully through her life. She has already asked me to order her a bee suite, so that we have it ready for her, when she helps me to harvest honey. Theirs just one problem, I don't even have the bee's yet!
The other standard Langstroth type hive was order through Evens cedar bee hives. Evens Cedar bee hives manufactures its hives using cedar wood. When it arrived in the mail I was very much pleased by the quality, materials and the cedar fragrance coming from the hive boxes. Besides the quality of their product, I also learned that Ryan Evens uses the proceeds of the sales of his hives to support the following causes. Evens Cedar Bee hives causes they support. If your looking to purchase a bee hive with the added benefit of having your purchase benefit someone in need, please feel free to check out his site you wont be disappointed.
Still my favorite site is world of beekeeping, Ron Upshaw and his collaborator Shawn have created an all in one website. Their is enough information on this site to keep a hobby beekeeper well informed and it is ever changing and evolving. It has a forum where like individuals with a passion for beekeeping can share their ideas, success and failer in this hobby. Ron and Shawn have created a beginners DVD for those considering beekeeping as a hobby which is available through their site, and they also have a second DVD to compliment their first, ready for release. If you have ever been curious about beekeeping give their website a try.
Starting this bee project takes me one step closer to accomplishing the goal of sustainability. Being able to produce my very own raw honey is the best outcome of this project. It also creates bee habitat that will benefit both the Eco system and the fruit production in my vegetable garden and that of my neighbors as well. Hopefully I will be successful in this current endeavor, understanding that bee's are not pets, they a wild creatures and answer to no one but their Queen. I am just a keeper, that has been allowed to participate in their daily activities. Hopefully it will be a successful partnership between the bee's and I, where both will benefit.
Tuesday, July 19, 2011
Building from Failure.
It is the middle of July and the heat is on, it is literally scorching hot. Today I have just finished building the new chicken co-op for the ladies, as I have dubbed them. I have to say the chicken co-op is pretty to look at , but it is not exactly what I had envisioned when I order it. It just looked bigger in the catalog. Therefore, I will have make some modifications to the co-op if my girls are going to be happy in their new home. I am even considering painting it to match our home. When I first placed the order I was thinking of safety and easy of use, the co-op has both. Yet it lacks in size. I will modify the run, make it bigger and longer so they have room to exercise and spread their wings. Needing the co-op nightly to roost to sleep, and a place for them to lay their eggs allowing me easy access in retrieving the eggs .Just another one of the never ending projects here at my Urban hobby farm.
I have also ordered the bee hives, they are being milled as I type this post. They are going to be made of cedar. I hear that this type of wood keeps other pest from invading the hive. I will soon find out if its true. I am also excited about getting the honey bees here too. I should have done this earlier in the year. It turns out that I am having lots of trouble in the vegetable garden. I have the tallest tomato plants I have ever grown, but their doesn't seems to be any fruits on any of the tomato plants. The same goes for the bell peppers and the squash. I find it rather odd that the only vegetable which managed to set fruit is the cucumber plants. All the cucumber plants have large cucumbers ready to harvest. Makes me wonder if I had to depend on this back yard to feed me this season I would starve. Well at least I have cucumbers, that's a start.
However, it begs the question, whats going on? Why haven't my peppers, squash, or tomatoes set any fruit? Then I thought I might have a problem with insects eating the flowers buds before pollination. So I took a closer look and found that every thing seems fine, as far as pest are concerned. Their doesn't seem to be any that would be detrimental to the plants at any stage. No signs of anything eating away at them. Flower and leaves are intact. No sign of disease. Plants are strong, robust and flowering. Yet no fruit. I have the lavenders growing near my vegetable beds and they get frequent visits from all sorts of butterflies, digger bees, carpenter bees, and the occasional yellow jacket looking for a protein snack. Still, I haven't seen a honey bees, the biggest pollinator of them all. I am wondering if this summer heats to blame. Its been a scorcher this last couple of day's, but I have kept the veggies nice and hydrated. Making sure the planting beds do dry out. They have been properly fertilized and have been in the beds since March and it is just now getting truly hot. Yet there is no fruit. This seasons harvest is a bust. So I am hoping that when the bees get here, they can make a difference in the fruit production for the latter part of this 2011 growing season.
I am hoping to have them up and buzzing by the end of next week, hoping that their still time to get these veggies to set fruit. I am not giving up hope. I am learning as I go, so failure is part of the learning process. In order for me to achieve success in this endvore, I also need to learn how to fail too. And build from there.
Friday, July 8, 2011
When Sustainablilty Bites.
Urban Farming by choice isn't the path commonly chosen by city dwellers. However, those of us that love to see patches of green will usually find the transition of urban gardening to urban farming very easily. Not to stay that the actual work is easy. No way that's far from true. It is defiantly hard work, but well worth the effort. Urban farming as it is now called, is the transition from growing a few vegetables as a hobby, and slowly migrating towards growing fruits and vegetables as a source of sustainability. It's the act of trading lawns for vegetable beds. The size of an Urban farm garden is only limited to amount of space the individual grower has to cultivate and the amount of time allocated by the grower towards its up keep. Keeping in mind the weekly activities of this individual is important, full time careers, raising children, schoolwork, house hold chores this list get bigger and bigger. So you need to keep this in mind when planning an Urban Farm Garden.
Yet things get a little bit more complicated when deciding to add livestock to an Urban backyard Farm. I for one have made this choice and found it an easy decision to make. Having backyard livestock has its perks, free eggs, meat and manure, but this also comes with a bit of responsibility too. Having made this choice, of adding chickens as the livestock of choice in my Urban Farm, knowing all to well that it comes with the added responsibility of housing, feeding, and the over all health of hens. After all happy chickens make for better tasting eggs. Needless to say, it has been a learning process over this last year raising them. I had to take into account how these hen would survive within the co-op during the winter months. How would I get fresh water to them without it freezing in below zero weather. More to the point I had figure out how to protect them from predators. Yes, that's right. Having chicken's in your backyard not only gets the attention of your neighbors it also get the attention of your resident, raccoon, possums, and hawks.
My first encounter with the resident raccoon was not a pleasant one. I received a phone call one evening at work from my wife as she screamed in horror, as she gave me detailed accounts of the raccoons carnage in the hen house as it killed one of our hens. It was to be our first loss. I wasn't ready for the killing of the hens. I was content with having them for their eggs. The idea of butchering the hens was never part of the plan, and it took a raccoon to teach me this valuable lesson. I was saddened by the event, but not upset. I justified it as the natural order of things. I have been taking from the earth for as long as I can remember, well I guess nature wanted something back in return. Therefore, it took one of my hens as payment, I guess we are even for now. However, with this being said I was not going to have an encore performance. After that night, and every evening since this attack, the hen house has been on lock down. As soon as the sun sets, they are lock up for the night and then re- released at dawn. This routine seemed to work for a while until the attack came from above.
It was late August, and it was a beautiful Wednesday afternoon, the sun was out, with a light breeze and a slight promise of winter to come. I had been sitting outside, on my rear stoop, as I tossed the hens some scratch grains to keep them busy. I do this a lot with them, its really relaxing to watch them in action. As I tossed the feed scratch, the hens began pecking and scratching the earth as they do in search for edible tid bits. Then suddenly in unison, they froze, like children playing a childhood game of Simon says. Before realized what was happening they all made a mad dash to the four corners of the property. North, South, East, and West, they ran, under the porch, under shrubs, under tables anywhere for cover. I had no idea what was coming, but I knew it wasn't good. Then I saw the large dark shadow first. For a second there I though I should be running for cover myself. However before I had a mental picture of what was actually happening, it was something right out of a PBS special wild life program, it appeared right out of one of my oak trees. What seemed to me to be the most enormous hawk I have ever seen. The wing span was easily 3 feet across, and it was after my hens. I didn't have time to think just react. I keep a large rake by the rear stoops at all times for convenience . With one quick impulse I had the rake in hand waving it in the air making me appear larger then the hawk. The hawk seemed to get the point and took off. But not before it landed on my fence and looked at me as if to say, "I will be back". I had to agree with it, I knew it would be. I may have won that round, but I know it will wait for the day when it can catch me off guard. Therefore, I can never leave my guard down. The local wildlife is opportunistic, it will adapt to its changing environment. Therefore, I will have to keep one step ahead of the local wildlife at all times.
Not to say that I can protect my hens from everything. Mother nature will have her way. I quickly learned that chickens die. Ether by my hand or someone else's hand. No matter what I do some will make it, and live happy healthy lives, while others will fall pray to the local wild life or for no other apparent reason just die. Such is the order of the natural world. I had to learn that aspect of raising chickens in an Urban setting the hard way. For those of you who feel up to the challenge, and want to try their hand at raising chickens for eggs or a meat bird, make it a point to learn the art of humanely killing of a chicken. It will come especially handy when one of your hens succumb to illness's. As a Urban hobby Farmer learning this aspect of farming is a must, it is not the most pleasant part of the craft, but necessary one. This was the part of Sustainability which I found that bites. I haven't graduated to butchering yet, and I don't know if I will ever be ready. But as the saying goes,"knowing is half the battle". Once I have mastered the art of butchering a chicken, I will be ready for what ever comes my way.
Subscribe to:
Posts (Atom)